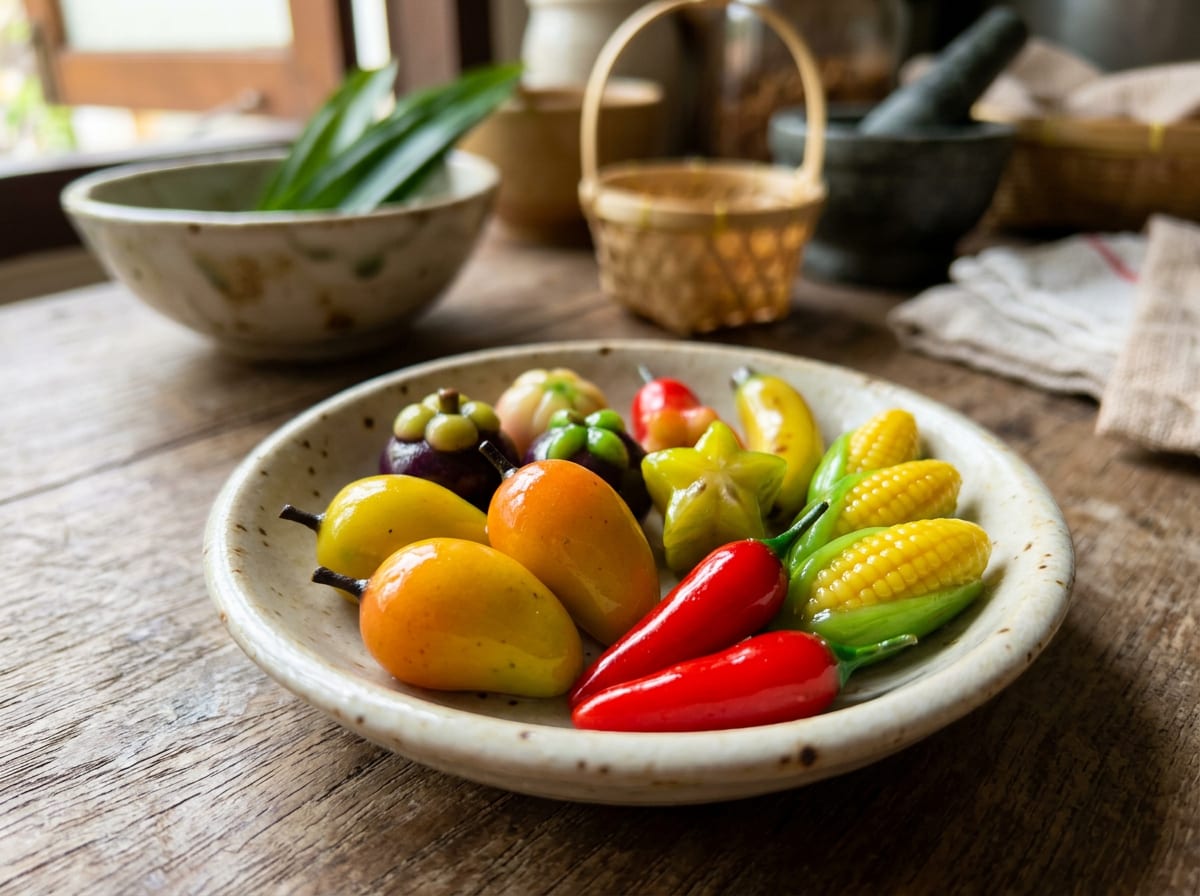
Luk Chup (Thai mock fruits)
Hand-molded, hand-painted mung bean paste shaped into miniature mangoes, chilies and corn cobs, then dipped in a thin agar glaze that sets into a glossy skin. A royal Thai confection descended from Portuguese-introduced marzipan technique, and a genuinely fiddly, patience-testing project.
Technique adapted from Hungry in Thailand's Luk Chup recipe, cross-checked against Lion Brand's and Yochana's versions
Ingredients
Mung Bean Paste
- 60 g dried split mung beans (peeled, moong dal), rinsed until the water runs clear, then soaked at least 3 hours, preferably overnight rounded
- 70 ml coconut milk, well shaken rounded
- 35 g granulated sugar rounded
- 1 g fine salt rounded
Agar Glaze
- 4 g agar-agar powder, a plant-based setting agent, sets at room temperature, which is what gives the glassy, firm skin rounded
- 120 ml water rounded
- 20 g granulated sugar rounded
Decorating
- to taste gel food coloring in several colors (red, green, yellow, brown), a few drops of each mixed with a little water, enough for mango, chili and corn rounded
- to taste cornstarch, for dusting your hands, keeps the paste from sticking while you shape it (optional) rounded
Dietary labels are a guide, not a guarantee. If you have an allergy, read the ingredients yourself.
Method
Be honest with yourself about this one first: luk chup is not a quick sweet. The paste itself is simple, but the shaping and painting is slow, repetitive hand work, and the first batch you make will look like a beginner’s batch, however careful you are. Thai vendors who sell these professionally have made thousands of them; you are making 22. Give yourself a relaxed afternoon, put on something to listen to, and treat the shaping as the point rather than an obstacle between you and dessert.
- Soak the beans. Rinse the split mung beans in a sieve until the water runs clear of starch. Cover with plenty of cold water and soak at least 3 hours, or overnight in the fridge.
- Steam. Drain the beans and spread them in a cheesecloth-lined steamer basket. Steam over simmering water for about 20 minutes, until a bean mashes easily between two fingers.
- Puree. Let the beans cool slightly, then blitz them in a food processor with the coconut milk, sugar and salt until you have a completely smooth, thick paste with no visible bean fragments. This step is what saves you from a grainy final texture, so don’t rush it.
- Cook the paste. Scrape the puree into a small, heavy pot and cook over low heat, stirring constantly with a silicone spatula, for 15 to 20 minutes. It will loosen slightly before it tightens back up; keep stirring and scraping the base and sides. It’s ready when the paste pulls cleanly away from the sides and bottom of the pot as you stir, and a spoonful holds its shape without slumping.
- Cool and knead. Turn the paste out onto a plate or into a bag and let it cool to room temperature, about 30 minutes. Once cool, knead it briefly with your hands until smooth and pliable, like a soft marzipan.
- Portion. Divide the paste into pieces of about 7 g each (roughly the size of a small marble); you should get about 22. Keep the pieces you’re not working on covered with a damp cloth or under plastic wrap so they don’t skin over and crack while you shape the rest.
- Shape the fruit. Roll each portion into a smooth ball, then coax it into shape with your fingers: taper one end and curve it slightly for a mango, pinch a slender point for a chili, or roll and gently ridge the surface for a corn cob. Push a wooden skewer or toothpick into the base of each shape to use as a handle for painting and dipping. Set the finished shapes upright in a block of florist’s foam, or stand them in a container of dry rice, and let them firm up for 15 to 20 minutes while you finish shaping the rest.
- Paint. Mix each gel food color with a few drops of water in a small dish, thin enough to move on a brush but not so thin that it runs. Using a fine artist’s brush, paint the shapes: a green-to-red blush for mango, deep green fading to a paler stem end for chili, pale yellow with darker flecks for corn. Layer colors lightly rather than loading the brush, and let each color set for a minute or two before adding the next. Work in batches and let painted pieces dry fully, about 15 minutes, before dipping.
- Make the glaze. Sprinkle the agar-agar powder over the water in a small saucepan and let it sit for 15 minutes to soften. Add the sugar, bring to a boil over medium heat, and stir until the agar and sugar are fully dissolved. Let it boil gently for about 1 minute, then take it off the heat and let it cool for 5 to 10 minutes, until it’s warm but no longer scalding, still fully liquid. Skim off any foam on the surface.
- Dip. Holding a shape by its skewer, dip it into the warm glaze, rotating gently to coat it evenly, then lift it out and let the excess drip off for a few seconds. Stand it back up in the foam or rice to set, about 10 minutes. The glaze will thicken as it cools, so re-warm it gently over low heat if it starts to set in the pan. Once the first coat is dry to the touch, dip each piece a second time for a fuller, glossier skin.
- Finish. Once the glaze is fully set and no longer tacky, about 20 to 30 minutes, gently twist or snip off the skewers close to the base. Trim away any glaze drips with kitchen scissors. Arrange on a plate to serve.
Notes
- This is a project, not a technique to nail on the first try. Expect your first mangoes to look a bit lopsided and your first chilies to look more like teardrops. That’s normal; the shapes get more confident the more of them you make in one sitting.
- Food coloring: gel colors give the most vivid, true shades without thinning the paste the way liquid drops can. If you’d rather avoid synthetic dyes, matcha powder gives a natural green, cocoa powder a soft brown, and a little turmeric a warm yellow, though the colors will be muddier than gel.
- The agar glaze is unforgiving of temperature: too hot and it melts the paint straight off the paste underneath; too cool and it sets into clumps before you can dip evenly. Keep it just warm enough to pour and work quickly.
- These don’t keep well. The agar skin weeps and softens within a day or two, and the paste can dry out at the edges. Store any leftovers in a single layer in an airtight container in the fridge for up to 2 to 3 days, and let them come back to room temperature before serving. Don’t freeze them; the glaze cracks and turns cloudy.
Sources Consulted
- Hungry in Thailand, “Thai Luk Chup Recipe (Mung Bean Dessert)”
- Lion Brand, “Fruit Shaped Mung Bean Dessert: Kanom Luk Chup (ขนมลูกชุบ)”
- Yochana’s Cake Delight!, “Thai Luk Chup”
The mung bean cooking method, the two-coat agar glaze technique, and the overall paste-to-coconut-milk-to-sugar proportions come from the sources. Quantities are scaled down to a home-sized batch of about 22 pieces, and the wording is original.
From Christoph Mayer